Unlocking the Secrets of Stapelianthus keraudreniae Propagation: A Step-by-Step Guide
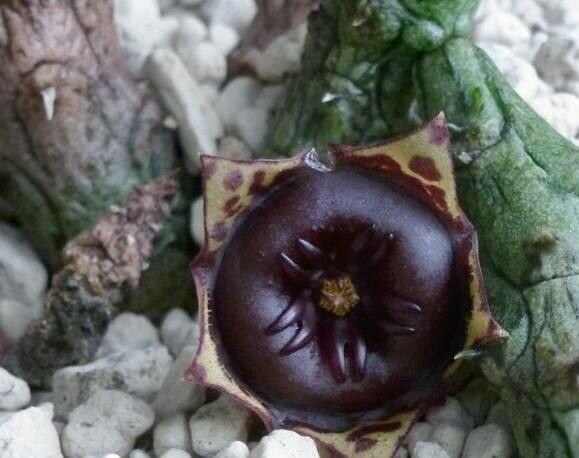
The world of succulents is full of weird and wonderful plants, and Stapelianthus keraudreniae, with its intriguing zig-zag stems and uniquely patterned flowers, is a prime example. Native to Madagascar, this fascinating succulent, while relatively easy to care for, might seem a bit intimidating to propagate. Fear not, succulent enthusiasts! This guide will unlock the secrets of propagating Stapelianthus keraudreniae, giving you the confidence to expand your collection and share the joy of these remarkable plants.
Two Roads to Success: Stem Cuttings vs. Seed Propagation
There are two primary methods for propagating Stapelianthus keraudreniae: stem cuttings and seeds. Each offers its own set of advantages and challenges:
1. The Cuttings Route: A Faster Path to New Plants
- Pros: Offers faster results and replicates the parent plant’s characteristics.
- Cons: Requires a healthy parent plant and carries a slightly higher risk of rot if not performed carefully.
Let’s break down the process of propagating through cuttings:
- Timing is Key: The best time to take cuttings is during the plant’s active growing season, ideally in spring or early summer.
- Select Your Weapon: Use a clean, sharp knife or pruning shears to take cuttings about 3-4 inches long.
- Callus Before Planting: Allow the cuttings to air dry for a few days (or even up to a week), letting the cut end form a callus. This crucial step prevents rot.
- The Right Medium is Essential: Prepare a well-draining potting mix specifically designed for succulents or cacti. A mix of perlite, coarse sand, and potting soil works well.
- Potting Up Your Cuttings: Plant the callused cuttings about an inch deep in the prepared soil, making sure the cut end is covered.
- Patience is a Virtue: Water sparingly, only when the soil is completely dry. It may take several weeks for roots to develop.
2. The Seed Route: Embracing the Element of Surprise
- Pros: Allows for larger-scale propagation and offers the potential for unique hybrids.
- Cons: Requires more time and patience, and resulting plants may not be identical to the parent.
Germinating Stapelianthus keraudreniae seeds:
- Source Fresh Seeds: Obtain seeds from a reputable supplier to ensure viability.
- Prepping Your Seedbed: Use a seed starting mix or a similar well-draining medium. Moisten the mix evenly.
- Sowing the Seeds: Sprinkle the seeds on the surface of the moistened mix, pressing them lightly. Don’t bury them too deep!
- Creating a Greenhouse Effect: Cover the container with a clear lid or plastic wrap to create a warm, humid environment for germination.
- Let There Be Light: Place the container in a bright location, but out of direct sunlight.
- Stay Consistent with Moisture: Mist the soil regularly to keep it evenly moist but not waterlogged.
- Practice Patience: Seed germination can take several weeks or even months. Once the seedlings are large enough to handle, you can transplant them into individual pots.
General Tips for Success:
- Light: Provide bright, indirect light for both cuttings and seedlings.
- Watering: Overwatering is a common mistake. Water only when the soil is completely dry. Let the pot drain thoroughly after each watering.
- Patience is Paramount: Propagating this succulent takes time and care. Don’t be discouraged if you don’t see results immediately.
By following these steps and arming yourself with patience, you can successfully propagate Stapelianthus keraudreniae and enjoy the unique beauty of this fascinating succulent for years to come. Remember, the journey of propagation is just as rewarding as the final result!