How to Propagate Haplopappus glutinosus
Golden Symphony: Propagating the Sticky Goldenbush (Haplopappus glutinosus)
The Sticky Goldenbush, scientifically known as Haplopappus glutinosus, is a delightful California native plant that brightens up the landscape with its vibrant yellow, daisy-like flowers. While admired for its beauty and ability to attract pollinators, many enthusiasts wonder how to welcome more of these golden beauties into their gardens. Fortunately, propagating Haplopappus glutinosus can be a surprisingly enjoyable and rewarding experience.
This guide offers two primary methods to multiply your Sticky Goldenbush collection:
Method 1: Seed Starting
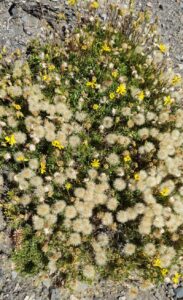
- Seed Collection: In the late summer or early fall, keep an eye out for the fluffy seed heads that appear after the flowers fade. Collect the seeds when they are dry and easily separate from the plant.
- Cold Stratification (Secret to Success!): Haplopappus glutinosus seeds benefit from a period of cold stratification, which mimics their natural winter dormancy. Place the seeds in a moistened paper towel, seal them in a plastic bag, and store them in your refrigerator for about 4-6 weeks.
- Sowing: Once stratified, sow the seeds in seed trays filled with a well-draining seed-starting mix. Sprinkle a thin layer of soil over the seeds, as they need light to germinate.
- Watering and Light: Keep the soil consistently moist but not waterlogged. Place the trays in a bright location but out of direct sunlight.
- Transplanting: After a few weeks, seedlings will emerge. Once they develop a few sets of true leaves, carefully transplant them into individual pots or directly into your garden, ensuring they have plenty of space to grow.
Method 2: Cuttings
For a faster propagation technique, consider growing Sticky Goldenbush from cuttings:
- Timing is Key: Take cuttings during the plant’s active growing season, ideally in the spring or early summer.
- Selecting Cuttings: Choose healthy, non-flowering stems that are about 4-6 inches long. Make a clean cut just below a leaf node (where the leaf joins the stem).
- Preparing the Cuttings: Remove the lower leaves from the cutting, leaving only a few leaves at the top. You can dip the cut end in rooting hormone powder (optional) to encourage root development.
- Planting and Care: Insert the cuttings into a pot filled with a well-draining potting mix. Water well and cover the pot with a clear plastic bag to create a humid environment.
- Rooting and Transplanting: After a few weeks, tug gently on the cuttings to check for resistance, which indicates root growth. Once rooted, remove the plastic bag and gradually acclimate the plant to normal conditions. When they are established, you can transplant them to their desired location in the garden.
Tips for Success:
- Well-Draining Soil: Sticky Goldenbush thrives in well-drained soil. Amend heavy clay soils with sand or compost to improve drainage.
- Sun-Kissed Location: Provide your plants with at least 6 hours of direct sunlight daily for optimal growth and flowering.
- Water Wisely: While they are somewhat drought-tolerant once established, regular watering, especially during dry spells, is important for vigorous growth.
By following these simple propagation methods, you can easily expand your collection of these stunning native plants. Soon, your garden will be alive with the golden symphony of Haplopappus glutinosus, attracting pollinators and adding a touch of California sunshine to your landscape.