Unleashing the Prickly Power of Propagation: Your Guide to Multiplying Opuntia guatemalensis
The Opuntia guatemalensis, with its striking, paddle-like pads and vibrant flowers, is a captivating addition to any succulent enthusiast’s collection. But did you know that this fascinating plant, also known as the Guatemala Prickly Pear, is surprisingly easy to propagate? That’s right, multiplying your prickly pear collection is an achievable feat, and this guide will equip you with the knowledge to do just that!
Understanding the Basics: Two Paths to Propagation
Opuntia guatemalensis, like many succulents, can be propagated through two primary methods:
Seed Propagation: While possible, growing from seed can be a slow and unpredictable process. Seeds require specific conditions and take longer to develop into mature plants.
- Pad Cuttings: This method, leveraging the plant’s segmented growth habit, offers a quicker and more reliable route to success.
For the sake of simplicity and higher success rates, we’ll focus on the exciting world of propagating Opuntia guatemalensis through pad cuttings.
The Art of the Cut: A Step-by-Step Guide to Pad Cuttings
Gearing Up: Gather your tools – a sharp, clean knife or pruning shears, gloves (essential for handling prickly pears!), a container filled with well-draining potting mix, and, optionally, rooting hormone.
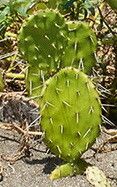
Selecting the Pad: Choose a healthy, mature pad from your Opuntia guatemalensis. Ideally, opt for a pad that’s at least six months old and shows no signs of damage or disease.
Making the Cut: Wearing your gloves, carefully twist and remove the chosen pad from the parent plant. Make a clean cut at the base where the pad joins the stem.
Callus Formation: Leave the cut pad in a warm, dry location for a few days to a week. This allows a callus to form over the cut surface, which prevents rot when planted.
Ready, Set, Plant!: Once the callus has formed, dip the cut end in rooting hormone (optional, but recommended) and plant the pad upright in the prepared potting mix. Bury about one-third of the pad’s height in the soil.
Patience, Young Padawan!: Place your newly potted pad in a bright location but out of direct sunlight. Water sparingly, only when the soil is completely dry.
- Root Formation: After several weeks, gently tug on the pad. If you feel resistance, congratulations! Your pad has successfully developed roots and is on its way to becoming a thriving new plant.
Nurturing Your Prickly Progeny:
Once your propagated Opuntia guatemalensis plants are established, follow these tips for their long-term well-being:
- Sunlight: Ensure they receive plenty of bright, indirect sunlight, gradually increasing their exposure to direct sunlight as they grow.
- Watering: Water deeply but infrequently, allowing the soil to dry out completely between waterings.
- Fertilizer: Feed your prickly pear with a balanced, diluted fertilizer during its growing season (spring and summer).
With a little patience and care, you’ll be amazed at how readily your Opuntia guatemalensis plants will multiply. Propagation is a rewarding endeavor that not only expands your plant collection but also allows you to share the joy of these fascinating succulents with others. So go ahead, unleash your inner plant parent, and watch your prickly pear family flourish!