Multiplying the Marvel: Your Guide to Propagating Huernia Kennedyana
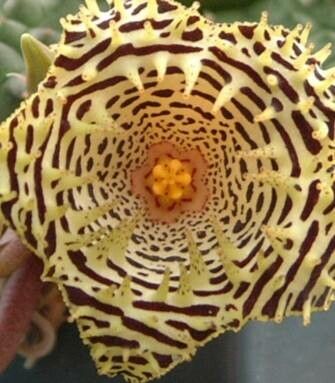
Huernia kennedyana, with its otherworldly, patterned blooms and intriguing, spiny stems, is a captivating addition to any succulent collection. But these fascinating flora aren’t content with just looking impressive—they also love to multiply! This makes propagating Huernia kennedyana a rewarding experience, even for novice gardeners.
Whether you’re looking to expand your own succulent haven or share the joy of these unique plants with others, there are two primary methods to propagate Huernia kennedyana: stem cuttings and seeds.
Conquering Cuttings: A Step-by-Step Guide
Propagating Huernia kennedyana from cuttings is surprisingly straightforward and boasts a high success rate:
1. Gather Your Tools: You’ll need a clean, sharp knife or pruning shears, a well-draining potting mix specifically formulated for succulents, and small pots (around 2-3 inches in diameter).
2. Take the Cutting: Choose a healthy stem segment at least 2-3 inches long. Using your sterilized cutting tool, make a clean cut where the stem meets another stem or close to the base of the plant.
3. It’s All About the Callus: This crucial step is often overlooked but is vital for preventing rot. Allow the cut end of your stem to dry and form a callus over the wound. This can take anywhere from a few days to a week, depending on the environment’s humidity. The cut end should appear dry and slightly puckered.
4. Planting Time: Fill your prepared pots with the succulent mix, moistening it lightly beforehand. Create a small indentation in the center and gently insert the callused end of the cutting, burying about an inch of the stem.
5. Patience is Key: Place your potted cutting in a warm, brightly lit location, but avoid direct sunlight, which can scorch the delicate new growth. Water sparingly, only when the potting mix is completely dry.
6. Signs of Success: After a few weeks, you should start seeing new growth emerging from the base of the cutting. Once the new plant seems established with a good root system (usually within a couple of months), you can begin treating it like a mature Huernia kennedyana.
The Seeding Adventure: A Longer but Rewarding Journey
Propagating from seed takes more time and patience but offers the potential reward of witnessing the entire life cycle of your plant:
1. Sourcing Your Seeds: Obtain fresh seeds from a reputable succulent supplier or by carefully pollinating your own Huernia kennedyana flowers.
2. Sowing the Seeds: Prepare a seed tray or small pots with a well-draining, seed-starting mix. Sow the seeds thinly over the surface and lightly cover them with a thin layer of the mix (no more than 1/4 inch).
3. Create a Humid Haven: Mist the seed tray thoroughly with water and cover it with a clear plastic lid or wrap to create a warm, humid environment. Place the tray in a brightly lit location, out of direct sunlight.
4. Germination Delights: Germination can take anywhere from a few weeks to a couple of months. During this time, keep the seed-starting mix consistently moist but not waterlogged.
5. Thinning Out the Crowd: Once the seedlings have developed their first set of true leaves, thin them out gently, leaving the strongest ones to flourish.
6. Transplanting Time: Once the seedlings reach about an inch tall, you can transplant them into individual pots filled with succulent mix.
7. Patience, Once Again: Be prepared—seed-grown Huernia kennedyana can take several years to reach maturity and produce their signature blooms.
Whether you choose the quicker route of cuttings or embark on the adventure of seed propagation, multiplying your Huernia kennedyana is a rewarding experience. With a little care and attention, you can soon have a wealth of these striking plants to admire and share!